Happy Friday!
Today I have 2 cards for 2 great challenges!
I rejoined the CAS-ual Fridays Challenge design team, yay!
You know I love my clean and simple cards, so I've always loved this challenge!
But the exciting news is that Michele created another challenge for those folks who love lots of layers and details, which is me too! haha! The new challenge is CAS-ual Chic, for Utterly Adorable Layers! Clever, huh?! Luckily she's letting me make cards for this challenge too! :)
I think it's going to be really fun creating two different looks with the same theme!
This week's challenge is embossing, any kind!
I was going for a "chalkboard" look (I hope you can tell!) with an embossed sentiment!
Here's what I did:
1. Stamp "Smile" on card with Versamark
2. Heat emboss "Smile" with white embossing powder
3. Rub white pigment ink, strategically, all over card with kleenex
4. Apply white pigment ink along card edges straight from the ink pad
5. Fold washi tape in half and adhere to card
6. Cut out a little banner from patterned paper and sew to card
7. Inside, I added a white panel and stamped "it's your birthday...get your happy on" from the CAS-ual Fridays Stamps Whole Shebang stamp set.
Supplies
Black cardstock
Jenni Bowlin patterned paper
Versamark ink
White pigment ink
White embossing powder
Heat tool
Washi tape
sewing machine, thread
(Close up of dry embossed flowers with Big Shot, kind of hard to see!)
I had a lot of fun with this card and used a lot of goodies!
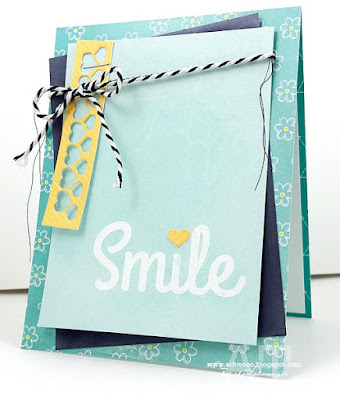
Here's what I did:
1. Stamp "Smile" on card with Versamark
2. Heat emboss "Smile" with white embossing powder
4. Place the 5 flower dies under the Pool Party cardstock and emboss with Big Shot
5. Rub white pigment ink strategically all over embossed cardstock with Kleenex
6. Sew the Pool Party cardstock to the Black cardstock
(you could skip this step, it just allowed the top layer to kind of "float" on top of the black)
6. Die cut the little hearts strip with the Fun-Fetti Fri-Dies & staple to layered cardstock
7. Glue one little heart over the dot on the "i"
8. Wrap cardstock pieces with black & white twine and attach to card base with foam dimensionals
9. Inside, I added a white panel and stamped "it's your birthday...get your happy on" from the CAS-ual Fridays Stamps Whole Shebang stamp set.
Supplies
SU Pool Party & Basic Black cardstock
Jenni Bowlin floral patterned paper
Studio Calico striped gold patterned paper
Black & white twine
White pigment ink
Versamark ink
White embossing powder
Heat tool
Big Shot
sewing machine/thread
stapler
I hope you'll come play along with both challenges!
You've got until July 28th link up your entries!
Thanks for stopping by! Hugs & happy stamping!


